
You will need a PAID Webflow plan to be able to add the Buying Buddy library and widget codes.
There are 4 steps to install and setup Buying Buddy on your Webflow website:
- Get a Google Map API Key.
- Install the Buying Buddy plugin as JavaScript.
- Create 2 new web pages and add the "results" and "details" widget short codes to them.
- Setup Social Share settings.
This article provides detailed instructions to guide you through these steps.
Step 1: Get Your Google Map API Key
A Google Map API key is required.
A Google Map API Key is required for any widget that uses a map. Widget features that do not use the map will function normally without a map key.
You should not postpone getting a Map Key - do this straight away so that everything works and you do not have to repeat this process.
Note: If this is a production or live website, you should obtain a Map Key.
Even if the Google Maps JavaScript library is being loaded (including a valid API Key) by third party code in you website, you must STILL add your Google Map API Key here.
Follow these instructions to Get a Google Map API key.
When you have created your Key, make sure it is added to the Plugin Installation and Settings in your Buying Buddy account before proceeding with the next step.
Step 2: Add Buying Buddy Plugin to Your Site
Step 2a: Get the Buying Buddy JavaScript Library Code
- Login to your Buying Buddy dashboard at leadsandcontacts.com.
- Go to Plugin Installation and Settings for your website.
- Select the appropriate website.
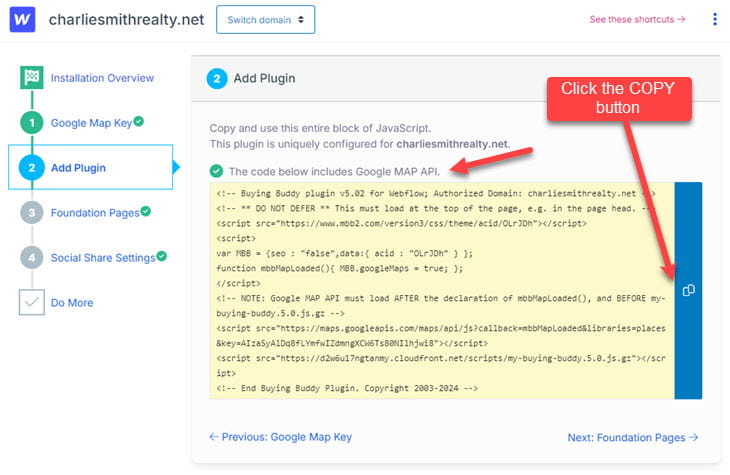
On the Installation Overview tab, make sure that your site is set as a Webflow site.
For a Webflow website you will be shown the JavaScript that is your Buying Buddy Plugin. - Go to the "Add Plugin" tab and COPY the plugin code.
Step 2b: Add The Plugin to Your Site
Login to your Webflow website dashboard where you can edit your site.
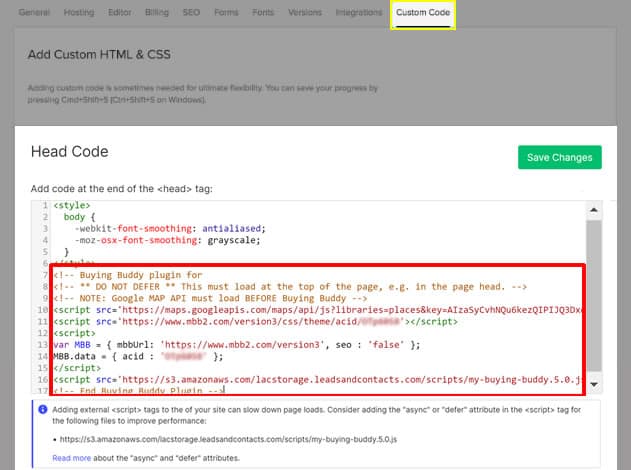
- Go to the PROJECT SETTINGS section for your website.
- In PROJECT SETTINGS, click on the CUSTOM CODE tab.
- Paste the Buying Buddy JavaScript code (see above) in the HEAD CODE panel and and then click SAVE CHANGES.
This ensures that the Buying Buddy JavaScript is loaded on every page in your website.
DO NOT MODIFY THE CODE.
E.g. Webflow may show a warning message advising you to 'defer' or 'async' load the Buying Buddy plugin script, which you must ignore. Do NOT do this as this will break the plugin.
Step 3: Add Foundation Pages with Widgets
Step 3a: Add 2 Foundation Pages
Create and 2 new pages that are required for Buying Buddy:
- Results Page
- Property Details Page
Plus, you should add a Search Form widget on any other different page too for testing.
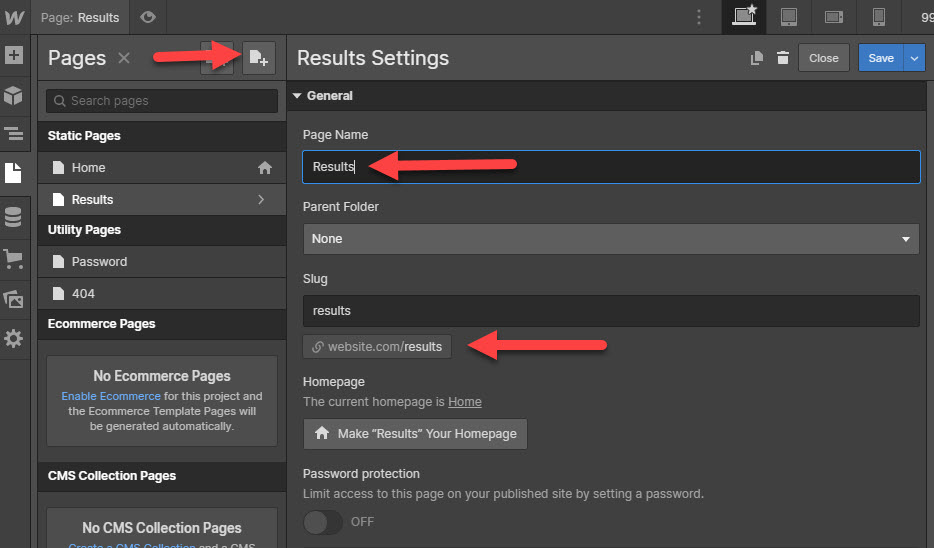
- Go back to your Webflow site editor, and create create two BLANK PAGES.
We suggest you give them appropriate titles, such as "results" and "details".
These 2 pages should NOT be displayed in the menu.
Step 3b: Add Widgets to the 2 Foundation Pages you just created
- Next, select your new "results" page to Edit it, and then add an Embed component.
- In the code panel, paste the following short code for the Buying Buddy "Results" widget:
<div id="MBBv3_ListingResults"></div> - SAVE your page.
- VERIFY. Once you have SAVED this page, preview it to see Buying Buddy results widget being displayed on the authorized domain (this will not display if you are using a sandbox development domain).
Excellent! Now you have set up the Results Foundation Page. - NOW REPEAT the above steps to setup your Details page ** Do not forget to do this! **
The Widget short code to use is:<div id="MBBv3_SearchDetails"></div>
Note: The details widget WILL display a SQL error if you preview it - ignore this.
Excellent! You have now set up the Details Foundation Page. - Finally, paste the Search Form widget to any other page using the process described above (this is for testing the search - this is not a foundation page).
(Do not add the search widget to your "results" or "details" pages as this will break the widgets.)
The Search form short code is:<div id="MBBv3_SearchForm"></div>
Before testing - complete the next step!
Step 3c: Configure your Buying Buddy account so that page names match
It's important that the Buying Buddy system knows the page address you used for your Foundation Pages.
Buying Buddy needs to know where to go to show search results, and where to direct your leads (via emails etc.) to see search results and details of a specific property.
So in this step, you will update the Foundation Page settings in your Buying Buddy dashboard, to match the actual page addresses you created.
- In your Buying Buddy dashboard, navigate to Plugin Installation and Settings.
Then select the domain. - Click the " Foundation Pages" tab to review the page addresses of the Foundation pages.
- Check the page names shown and update them if needed.
- You will see that they are probably shown as /listing-results and /listing-details. If the details and results pages are using different slugs, then you need to change these to say the actual names of the pages you created, and in the browser when viewing these pages you will see the full address.
NOTE: Use the actual page names for YOUR site - don't assume that they are the same as shown in this example!

Step 4: Enable Property Sharing
Stay in the Plugin Installation and Settings page in your Buying Buddy account for this next step!
Go to the Social Share Settings tab.
To ensure that the social share options can be used to share properties from your website on Facebook etc, you must add an A RECORD to your domain's DNS records.

Then go to "Social Share Settings" tab- Modify the DNS records for your domain as follows:
Add an A-RECORD for the subdomain "bb"
to point to: 52.206.194.238 - Once you have added your A-RECORD, set the 'Social Share Option' (below) to be YES, and Save settings.
Troubleshooting
"SQL Error" on Details Page
If you see this message then this is because you are attempting to view the Property Details widget on a page on its own without a reference to a property! Ignore this, the widget is installed correctly and this error is never seen.
Staging / "Sorry this domain is not authorized"
If you see a message that says "Sorry this domain is not authorized", then this means that the Widgets and Plugin JavaScript are indeed working correctly, BUT that your page address is a domain that is not authorized to display Buying Buddy Widgets. It is probably a staging domain that Webflow has applied while you are in the editor of your website.
There are two options for dealing with this:
- Make sure your actual domain name is applied and working - and then view the "live" site in which case widgets will be displayed correctly. You can then choose to ignore this message while in development.
- If you need to do more extensive development then you can request (via Help Desk) to add your Webflow development staging domain as an extra (free) "authorized" domain on your account.
We call this a 'sandbox' development URL and it would be authorized temporarily while you do development.
Step 5: Doing More
Your Webflow site editor will allow you to create custom search forms and use all the capabilities of the Buying Buddy widgets.
Some example that you may like to consider include;
- Adding a Featured Listings page to display your own listings
- Showing your Sold properties
- Creating neighborhood pages with properties for neighborhoods
- Adding lead capture forms that send leads directly to the Buying Buddy CRM
- Adding a general contact form widget
- and a lot more!
You can now use Widget Themes to style widgets - or even add custom CSS too if you wish to.
See our demonstration website for ideas and inspiration.
ALL the methods you will see are applicable to, and can be set up like this in Webflow.
If you need more help please contact us.