The Lead Capture Form (LCF) Widget allows you to present various FORMS in your website that present different offers to consumers e.g. "Get Property Alerts". When the form is filled in and submitted, the contact details are captured as a lead in your account.
The LCF Widget is a single multi-purpose widget that allows the same underlying FORM to be used in different ways. A single LCF widget may be re-used many times, and can be deployed differently each time.
Available Forms
- CMA - shows a typical CMA form which helps sellers tell you about their property for sale
Note: Because the CMA forms use Google Map API to help with address lookup, there can only be one instance of a CMA form on a page - and this cannot be on a page with the Map. - CMA Short - CMA form with fewer options
- Dream Home - shows the 'dream home' form for helping buyers define their needs
- Contact Me - shows the 'contact me' form for general contact
- Alerts - allows the consumer to request email property alerts
- Alerts Short - short form with fewer options, allowing consumer to request email property alerts
- Showing - consumer may request a showing (general form, not linked to a property)
- More Info - consumer can request more information on a property (general form, not linked to a property)
Selecting the type of form that your widget displays is achieved by using a filter option.
See the section on filters below.
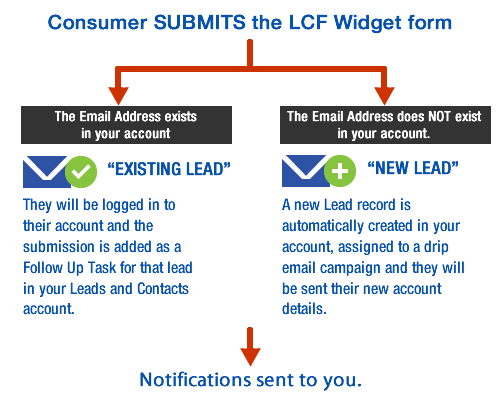
Lead Capture Process
Defaults
Without any filters applied, this widget will show the default Lead Capture Form that lets consumers sign up for email alerts.
Display Options
A. Embed Form on a web page
Lead Capture Form widgets can be embedded on your webpage using the appropriate shortcode and filter to show the required form.
B. Show Form in a PopUp (modal)
Each LeadCaptureForm widget can also be displayed as a modal popup using a link / button.
A default title will always be shown at the top of the form.
To show the form, you will need to add a class "bfg-show-lcf" to the link / button.
For example, the following will show a button that, when clicked, will display the CMA Short form:
<input type='button' class='bfg-show-lcf' filter='form:cmashort+formname:CMA request' value='Show Form'>
Parameters
Widget ID (required)
id="MBBv3_LcForm"
This defines the widget to be a lead capture form widget
Filters
A Filter string for a LCF widget can include additional parameters that define the form and how it is to be used. The various parameters can be combined as needed by using the PLUS + sign (no spaces) to join the parameters.
The following filters can be used:
Type of Form
filter="form:type"
There are 7 possible values. Each form type is designed to collect slightly different information.
- cma - CMA
- cmashort - condensed CMA form
- dh - dream home
- contactme -contact me
- alerts - consumer request to receive email alerts
- alertsshort - condensed email alert request
- showing - showing request
- moreinfo - property information request
EXAMPLE
<div id='MBBv3_LcForm' filter='form:cma'>
[mbb_widget id='MBBv3_LcForm' filter='form:cma']
Form Name (recommended)
filter="formname:name"
The formname variable is used in the email correspondence back to the lead and also is the label to the 'Follow Up Task' that is shown in your Leads and Contacts account and alerts sent to you.
This is a simple way for you to distinguish the type of inquiry so that it's easier for you to follow up.
Probably the most important consideration in setting formname is making sure it 'reads' well in the email sent to the Lead.
In the email, it will used on the end of a sentence like this
"We have received your request for {formname}"
Example:
filter='formname:a free starbucks card'
- The email to the lead will then says: We have received your request for A Free Starbucks Card.
- And, the TASK in the Buying Buddy dashboard says "Inquiry Received: A Free Starbucks Card Follow Up"
So, some other examples might be
- formname:contact
Email to lead will say: We have received your request for Contact.
Task in Buying Buddy dashboard says Inquiry Received: Contact Follow Up - formname:a relocation pack
Email to lead will say: We have received your request for A Relocation Pack
Task in Buying Buddy dashboard says Inquiry Received: A Relocation Pack Follow Up - formname:a home valuation
Email to lead will say: We have received your request for A Home Valuation
Task in Buying Buddy dashboard says Inquiry Received: A Home Valuation Follow Up
Require Phone Number, or Not
filter="phone_rqd:{yes|no}"
There are 2 possible values.
- phone_rqd:yes. This will make the mobile phone number required
- phone_rqd:no. This will make mobile phone number not required
If this filter is NOT specified, then the form will use the Lead Capture Settings set in CRM Settings for your account.
So, if the Account's Lead Capture Settings 'require' phone number, but you wish to have a form where this is not required, then specify phone_rqd:no.
Text and Styling Options
filter="showtitle:{yes}"
The default setting is not to specify this filter at all.
Any value (e.g. 'yes') will show the default titles text on on-page forms (the default titles are always shown on popups if they are used so that the form has a heading).
filter="title:{text-here}"
If this is set, it will always be displayed.
filter="description:{text-here}"
This requires that the title is also set. If this is set, it will always be displayed.
filter="backgroundpanel: {requires 4 comma separated numbers as "rgba" values}"
E.g."backgroundpanel:255,255,255,0.25".
The only variable is the background panel color as "rgba".
If this is set, then the form will be displayed on a background panel with a max-width of 850px.
filter="labelcolor:{hex}"
Do not use the "#" character when specifying a hex code.
E.g. "labelcolor:5C5C5C"
This will set the color for label and title text.
filter="textcolor:{hex}"
Do not use the "#" character when specifying a hex code.
E.g. "textcolor:5C5C5C"
This will set the color for the body text on the form.
Redirect after Submission (optional)
filter="redirect:URL"
By default, when someone fills out a Lead Capture Form they will be shown a "Your submission was successful" message in a popup. The "redirect" parameter allows to change this behavior and redirect your prospects to a new web page.
Make sure you specify a full URL including "http://...".
Example:
filter='redirect:http://www.mysite.com/successpage.html'
Send Welcome Email?
filter="welcome_email:true/false"
By default when a "new lead" fills out a Lead Capture Form they will receive a welcome email. You can choose to suppress this welcome email by including the welcome_email variable.
We suggest you use this in combination with the "campaign" setting below.
filter='welcome_email:false'
Assign a Campaign (optional)
The campaign variable allows you to assign leads to an existing drip email campaign that is setup within your Leads and Contacts account. They will then automatically receive emails from that campaign. You can obtain the "campaign id" from the listing of the campaign details in Leads and Contacts.
There are two cases (both can be specified):
- For New Leads: filter="campaign:campaignID"
We suggest you combine this with the "welcome_email" setting above. - For Existing Leads: filter="campaign_existing:campaignID"
For existing leads, if this is not specified, then the standard system auto-responder email will be sent to the lead as a confirmation.
Example:
filter='campaign:1234'
filter='campaign_existing:1234'
Assign Inquiry to a User (optional)
filter="mbbagent:referral_id"
The Referral ID variable allows you to assign the inquiry to a specific User / Agent in your account. You can obtain the Referral ID from the User Profile page. Note - this is NOT the MLS Agent ID, the Referral ID is a unique id for this user in the Buying Buddy system.
Example:
filter='mbbagent:QsftV7'
Use
<div id='MBBv3_LcForm' filter='...'></div>
[mbb_widget id='MBBv3_LcForm' filter='...']
More Examples
Using the CMA filter as an example:
<div id='MBBv3_LcForm' filter='form:cma+formname:cma request'></div>
[mbb_widget id='MBBv3_LcForm' filter='form:cma+formname:cma request']
Depreciated
Form Title
This option is no longer supported